Archive for the ‘paper’ Category

Hump day crafts: baby shower

January 25, 2012

So, my little adopted sister is having a baby this spring. And she and her boyfriend just moved into a house. So, a party was in order. G’ma was planning it, which meant I was helping. So I designed this invitation:

Well, that’s the front of it anyway. I printed them on double-sided matte photo paper, so they looked good! Yes, I drew the baby, but I’m not really much of an artist. I followed this tutorial using my new drawing tablet for my computer, and then had to do a lot of fixing in Adobe Illustrator. I’m showing this next pic, so that you know that you, too, could do this, because I am so not an artist. Here was my original version of the baby after following this tutorial:

Yup. That’s what the baby started out looking like. But after some retracing, fills, adjusting lines, adjusting points, adding ovals to fill in the eyes, I finally got to my finished baby. No, he’s not perfect, but I was pretty proud. And to make the most of the time I spent on him, I put him on everything. Mini candy bar wrappers, mini peanut butter cup circle stickers, and even table decorations.

Per request, I also put together a matching banner:

…and a few games, including dress the baby (with a talking baby doll) and pin the thing on the baby:

Then, just to save a few bucks and clear a few extra things out of my craft room, I made about a dozen prizes (my other sister added a few more). Some were fun, like “my sippy cup” wine glasses and beer steins and a mustache mirror, but of course I didn’t take photos of those. But here are two I did capture:


Yes, it all was a lot of work. And, although it may sound petty, I was upset occasionally about spending so much time on it. But, when it was done, I had fun and was glad I’d put the effort in to help people enjoy it. After all, isn’t that what half of crafting is about?

Happy crafting!

Hump day crafts: Halloween party

November 2, 2011

It’s hard not to love Halloween. Candy, alter egos, and scaring the be-jesus out of people is all at least a little bit fun. We don’t generally go all out here, but we have a little bit of fun. This year, for the first time ever, we decided to have a Halloween party. Well, kind of. It was actually just a get together eating junk, making crafts, singing and dancing. Two get togethers. We had an afternoon one for Thing 1’s friends and an evening ‘party’ for family.

Cleaning my house is not my favorite thing to do, so I tried to set it up so we could mostly corral friends in the combined craft/play room. To set the mood, I made an entryway decoration:

I took half of a DollarTree table cloth (the other half was covering our play table to convert it to a craft table) and some black Contact paper, cut with my Cricut, of course. After applying the vinyl, I took my scissors and cut some strips, so people could walk through the door easily.

The kids did make plenty of crafts, although I was so busy running the party, I didn’t get much for photos. We did a pumpkin bookmark:

I cut the pumpkin on the Cricut, added some ribbon and let them decorate them as they pleased. (This one was my example.) We also did yarn ghost pencil toppers (based loosely on these). Oh, and sugar cookies. You just gotta decorate sugar cookies when celebrating a holiday. I’m just happy Thing 1 & 2 are getting to the age where they can participate. I was getting tired of decorating and eating them all myself. 😉

Honestly, it was exhausting, but oh so fun. I’m just glad we’ve got a year before we have to do it again.

Hump day crafts: Where did the summer go?

September 14, 2011

I’m a little sad that my last post had end of the school year gifts and here we are a week into the new school year. Where have I been? And where did my summer go? Last weekend it was in the 80s, this weekend they’re predicting rain and 60s. Bummer. But I’ll get over it. That’s what we moss backs in the Pacific Northwest do.

Even though my summer seems to have ended way too soon, we did get some crafting in. Here’s 10 crafts I did (some with help) during this short summer:

1. Knitted legwarmers – for my niece’s 8th birthday

2. Vinyled clipboards – made one for my sister-in-law as a gift, plus a couple for Things 1&2.

3. Knitted mini-Jayne Cobb hat – gift for my husband. (Yes, we’ve got a teeny bit of Firefly geek in us.)

4. Toilet paper roll joke book – The kids picked and illustrated the jokes to make a book to send to their dad.

5. Screenprinting – actually I should just say buying a Yudu since I’ve only done 2 projects so far.

6. I spy bottle – to entertain the kids on the pier while we waited for The Cat’s submarine.

7. Flannel boards – another pierside entertainer, except that we could only use these on the bus to and from the pier because the wind blew the laminated flannel backed pieces off the board.

8. Tie dye – my 10 & 13 year old niece and nephew visited from the midwest, so we had to break out the tie-dye kit to make some souvenirs. (I was too busy tying and dying to take pics of the process, but maybe I can get some from my mom later.)

9. Crafting for money – I sold some stuff this year — personalized for my mom’s soccer academy. She benefits from marketing and increased word of mouth, I make a little money to put toward a new cutter (hoping to be able to say goodbye to my cricut soon), and the kids get a special one-of-a-kind personalized useful something. I made water bottles for the kids and car decals for the parents.

10. Tenth anniversary print and cut card – I made this with SCAL and my cricut, plus my Canon MX870 printer.

I’d go on with details about each, but the school bus comes early this year, so I better call it a night. You can always post a comment asking for details. Happy crafting!

Hump day crafts: Valentine special – Wobble spring valentine and TP roll album

February 15, 2011

This edition of hump day crafts is a day early in honor of Valentine’s day. (It would’ve been up on Valentine’s Day, but we lost power here for nearly 12 hours!)

These valentines were inspired by one of the ladies over at the smartbuygal.com forums. She had made a motion birthday card and shared a link to this video tutorial on using or making wobble springs. I knew Things 1 and 2 would love that, so I got on it.

Luckily I had everything I needed on hand. Some great graphics (they were freebies for Valentine’s Day!) from the great folks at Lettering Delights, some 28 gauge wire, a 1″circle cutter and some cards. I decided to go with 6×6 inch cards for some extra impact. I used various cardstocks from my stash and a Cuttlebug embossing folder that came in an cut and emboss set (something to do with love, maybe?).

(I took the video after the kids got a hold of the cards, thus the twisted look to them.) I also used the Lettering Delights Monster Love alphabet for the inside sentiment:

I showed them to The Cat and he said they were cool. (That’s saying something, because usually he just nods and hands them back.)

Speaking of The Cat, I made him something special for Valentine’s Day: a mini album! This was my first try at one of these. I’ve been collecting toilet paper rolls for a couple of months trying to decide what would make a good album theme. I finally decided on “10 things I love about you”.

For this album, I tried so many new things: sewing, inking and sanding edges (my new Close to My Heart distressing kit came in handy for this!), aging photos, spritzing Tim Holtz’ distress inks, and (best of all) binding. I got myself the Cinch for Christmas (The Cat was out to sea) and this is the first project I’ve used it on. It’s so much fun, I can’t wait to find time to put together some more books. Here are some photos of my toilet paper roll album with tag inserts:

Happy crafting!

Hump day crafts: Quick paper crafts for The Cat

October 20, 2010

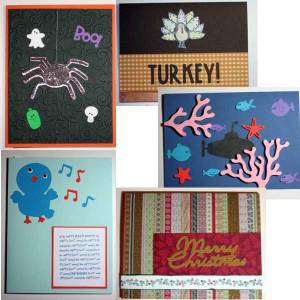
Everytime The Cat goes out to sea on his submarine, I send him with a box of cards and goodies. I try to make sure there’s a card for him to open each week, plus a few extras for holidays and stuff. Here are a few quick cards I created for this patrol:

Oct 2010 patrol cards

I also try to send out a new page for his 6×6 inch scrapbook. I used to struggle to finish the scrapbook page until I discovered collage prints. I can upload 4 photos and have them printed on a 4×6 photo with a colored background. Even a title if I want! When I get it home, I trim a little of the long ends and throw it together with a few embellishments and a cheesy poem to finish off the page. This year Thing 1 started kindergarten, so a first day of school page seemed appropriate. Of course, now I have to do another first day page, since Thing 2 started preschool as well.

6x6 1st day of Kindergarten

Enjoy and happy crafting!
Hump day crafts: Celebrate card

October 6, 2010

I signed up to be in a monthly Close to My Heart club for 10 months. Each month I have to order $25 in merchandise and one month I get hostess benefits. I’m not sure if I’d do it again, but I am enjoying my new toys. Here’s a recent stamp of the month I ordered — they were just too cute!

hedgehog celebrate cardHere’s a card I made for my mother-in-law’s birthday. I never know what to get her — or what kind of card will appeal to her. But this is cute without being too…anything. I colored the stamped hedgehog in with prismacolor pencils and then handcut it and attached it with pop dots (or similar). I’m trying to use my Cuttlebug more, so I embossed the background behind the “celebrate” stamp. I like the way it turned out, but unfortunately I messed up on when her birthday was and sent it a few days late. Oops! Hopefully she’ll forgive me soon.

Enjoy the card and happy crafting!

Hump day crafts: beach bash cupcakes

September 1, 2010

I was busy all last week getting ready for Thing 1’s fifth birthday. It was a Hawaiian Beach Blast, and although the weather didn’t cooperate for swimming, it was sunny enough to play in the sand. And eat beach cupcakes. Here’s what we ate:

They got the nummy nod, so that’s good. Plus they were cute. I love this cricut cartridge – Life’s a Beach. It is too much fun! I got to try a lot of cuts with this project (not all shown here) and they were easier to assemble than I had feared. (So is the Hello Kitty Greetings cartridge I picked up on clearance. Will have to post some of those cards later.)

The picks are some wooden ones I picked up at Joann’s. The background “sun” is from Accent Essentials. Each has a colorful sun center on the back with a 5 (from Life’s a Beach) on it. Did I tell you how much fun these were? And flavor? Strawberry with chocolate and yellow with chocolate with caramel frosting (for the “beach) and blue sugar for the surf. You could always do crushed graham crackers for more of a sand texture, but I just ran out of time.

Happy crafting!

Hump day crafts: big word book

June 9, 2010

I’ve been playing with the Cricut Design Studio trial lately. It’s fun, but such a pain coming from such intuitive software (at least after years of experience) like Adobe Illustrator. I made one small word book and was ready to give up on the whole experience and look into Sure Cuts a Lot or a similar software. Then I found this easy-peasy way to make wordbooks on the cricut.com messageboards. Armed with that knowledge, I made a gift for my daughter’s preschool teacher for the end of the year.

I didn’t decorate it, since I only had photos of kids from one of many classes. Instead I let her know she could put her own photos in it or have the kids sign it as a memento of the school year. She was thrilled! I was pretty happy with how it turned out too, since it was such a large word book for me. It’s not perfect, but neither am I. 🙂

There was one helpful hint I would add. If you’re not resizing or smooshing your letters too much, use the shadow feature (if the cart has it) for the book and remember what size you placed your letters at. That makes it easier to cut out letters to go on top later if you like that look.

I used poster board from the Dollar Store and rings from Office Depot to make this. Plantin Schoolbook is the only cartridge I used, since I’m still using the trial version of CDS.

Happy crafting!

Hump day crafts: card gift pack

May 12, 2010

Every once in awhile G’ma hints that she wants me to make her a card for someone. She never really asks, and so I never really get around to it. So, for her mother’s day gift I thought I’d give her a pack of homemade cards. Now, making a card always seems to take me forever, so this is a bigger gift of my time than it sounds. I did get a little smart about halfway through and started making two of the same (or similar) cards at once. The extra time was negligible and it helped build up my stash of cards. (I never have any ready ahead of time, which means I’m always scrambling the day of an event.) I also decorated a little box to hold them all (plus some postage stamps and a nice pen). Below are a few that I included:

    So happy...for you card    

Plus my first card from my Wild Card cricut cartridge, which I just got 2 days before Mother’s Day:   

Happy crafting!

Hump Day Crafts: Birthday cards

May 5, 2010

Things have been busy (aren’t they always), but I thought I’d do a quick post of a couple more birthday cards I made for family members back in March.

The first was for my brother-in-law, so it’s a little more masculine than some I post on here. I was playing with a new Cuttlebug folder and some aluminum foil. I mostly added the foil, so I could play with my new alcohol inks from Tim Holtz. I have no idea what I’m doing with them. LOL

I also was playing with my new Dymo embossing label maker I picked up at my local Goodwill. The front says “Do the math” and the inside says “you’re getting old” with the same paper sanded labeling. It’s a little family joke, since I’m 6 months older than him.

The other card was for my sister-in-law, who I picked up a gift card for. I wanted to make a card that would hold the card, and match it, since it was covered in shiny flowers. I found a pop-up idea somewhere (sorry, can’t remember to give credit where it’s due), and thought I’d try it with a cut out to show off the gift card.

The finished card is 4″x6″ and is made from a 6″x12″ piece of cardstock. It’s scored at 4″, 6″ and 8″, so it can be folded, slit and glued to make the pop-up piece.

For this card, I had to cut the circles carefully. I used my Fiskars shape cutter with circle template. The front is decorated with various Quickutz squeeze dies, some colored with Perfect Pearls pigments used as paint. I also used them on the embossed stamped butterfly. The grass is handcut. I did have to create my own template for an envelope for 4×6 cards, but we’ll save envelopes for another day.

Happy crafting!